
Animation Intro
The following is an intro to animation. The step-by-step instructions for each type of slide is on the right.
Adding animations
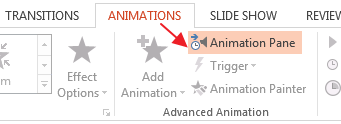
Animation Pane
When adding animations, first go to the ANIMATIONS tab. Then open the Animation Pane...
How to add animation to text/pictures
To add animation to text, click IN the text box. If have a bulleted list, make sure no text is selected. If you just have your cursor blinking in the box, then every list item will get animation; otherwise only what you have selected will be animated.
To add animation to pictures, click on one, hold SHIFT, and click on the other ones to select them all.
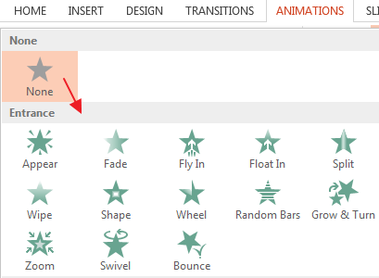
Then go to the ANIMATIONS tab and open more animations using the drop-down menu...
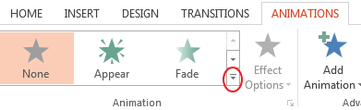
You will be adding green Entrance animations.
Collapsed list
Once you have animations, you may see a grey bar. This means the animations are collapsed. To expand the list, just click on the arrows.

Selecting animations in the list
If you want to change more than one animation at the same time, select them and right-click on any of them (or use the ANIMATIONS tab). To select more than one animation:
- entire list: click on the top one, hold SHIFT, and click on the bottom one in the list
- alternating ones: CTRL+click on the ones you want
Hiding Advanced Timeline
Each day your work on animation, you will need to do this step. Right-click on any animation in the Animation Pane, and "Hide Advanced Timeline".

Timing
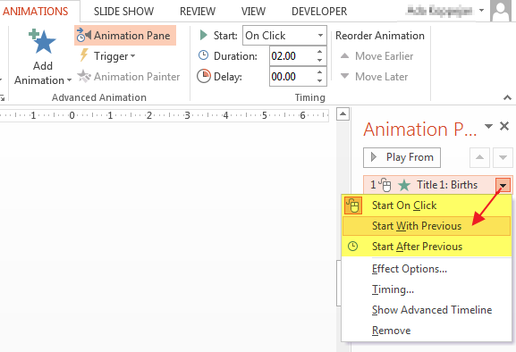
Start
There are 3 ways the animations can come in:
- On Click - won't come in until someone hits an arrow/Enter key/Space Bar
- With Previous = will come in automatically
- After Previous = will come in automatically after the previous animation is done
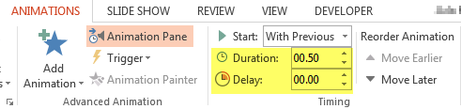
You can use the drop-down menu in the ANIMATION tab at the top...
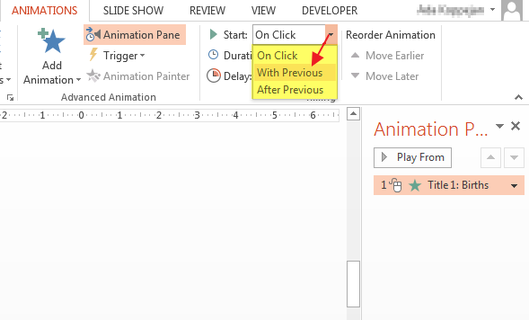
...or you can right-click on the animation in the Animation Pane to change it.
Duration & Delay
In the ANIMATIONS tab, you can also change how fast/slow the animation is by changing the Duration.
You can also have animations with a Delay so you have control of exactly when it comes in.
Effects
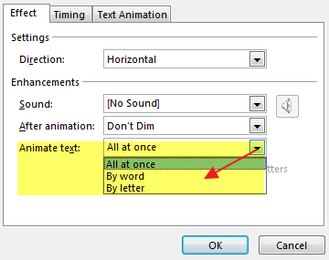
If you double-click on an animation (or right-click), it will open the Effect Options window, where you can change the animation to come in "By word" or "By letter".

View your slide show
There are 2 options to viewing your presentation:
- from the beginning --> press F5 to start from the beginning
- from the slide you're currently on --> SHIFT+F5 or use the toolbutton at the bottom right side of your window.
You can also go to the SLIDE SHOW tab and use the toolbuttons...

To stop the slide show, hit the ESC key.