
Flyer new


Table Set up
Insert > Table ...1 column and 5 rows.

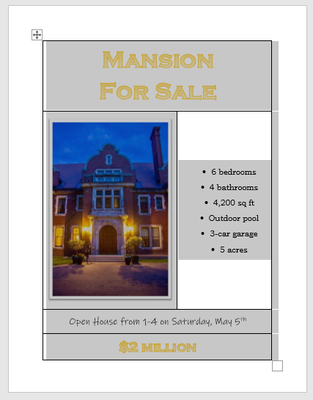
- Row 1: type out what's for sale, [Enter] then type out "For Sale" on the 2nd line.
- Row 4: type out a sentence/phrase
- Row 5: type out a price.

- Row 1: Select the text in the first row and do the following:
-
- font type Copperplate Gothic Bold (or Cooper Black)
- size 48.
- add any style.

Note: if your heading does not fit on 2 lines total, reduce the text!
- Row 4: make the font type Ink Free and size 20.
- Row 5: make the font type Copperplate Gothic Bold, size 28. Same style as the top. You can use the Format Painter and then pump down the font size.


Photo
Click in the 2nd row and go to Insert > Pictures... Online Pictures

- Type what you want to search for and [Enter]
- then uncheck the creative commons box.

Select a picture and Insert.

if Wide picture...
If you have a wide picture, you may need to crop it or make it smaller so it fits in the row. You must make it a bit smaller than the width of the table, so you see about 1" of empty space to the right of it it.
If it's a wide picture like this, click in the 3rd row and Split Cells (right-click or go up to Layout). Say OK to the window that pops up.


if tall picture...
If your picture is tall like this, split the 2nd row...

Delete the empty row: click in the empty 3rd row and Delete>... Delete Rows


Now make the split column wider, so it's at least as wide as the "For Sale" text.

Bullets
Add bullet text, make them font type to Bookman Old Style, and pump up the size to 16.
- Wide picture: in the split row, add 3 bullets on one side, 2 bullets on the other side, bullets on one line only (if more lines, split into separate bullets)
We want one side to have less bullets/text/lines than the other so we'll be able to see a difference when we add paragraph spacing later.


- Tall picture: click in the split cell and add 6-8 bullets

Picture format
picture height
Select the picture and go to the Picture Format tab at the top...
- Wide picture: set Height to 3.5" (type it in and [Enter])

- Tall picture: set Height to 5"

Manually change the side handles to make the width of your picture smaller,
so it's not quite filling the entire column.


picture style
With the picture selected, go to Picture Format and add the first picture Style...


Filling page
Bottom margin
Hover over the Ruler where the margin stars (white/grey), when you get a 2-pointed arrow and it says Bottom Margin, pull down to the 1/2" mark.


paragraph spacing
Select all the text (CTRL+A) and go to Paragraph options...

In the window that opens up, set the spacing to 12 pt before & after, Single line spacing and the box needs to be empty (not shaded or checked).

Everything should fit on one page, no extra blank page. If you have an extra page, change the page heading and price styles to one that takes up less room.


Table formatting
cell alignment
Select just the table and go to Layout and set cell alignment to middle-middle.


no border
With the table selected, go to the Borders button and choose No Border.


