Fish

Body
Insert a new layer and rename it "body".


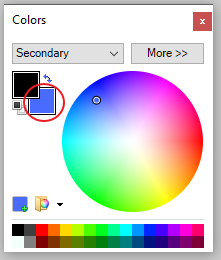
Set your secondary color to your fish color. Click on the back square and then set the color. Make sure primary stays black.

Select the Ellipse Shape tool...

Set it to draw Outline & Fill.

Set the border size to 5.

Draw an oval to start, about this size. Need a bit of room above, below and behind for the fins & tail.

Make sure you've drawn the body in a new layer, not in Background! (if you did, CTRL+Z and start over).


Apply the Bulge effect (under Effects>Distort)

Play with the center and amount to get a slightly different body shape.


Tail
Insert a new layer, call it "tail".

Select the Shape tool - change it to Heart

Draw a heart about this size...

Rotate the heart like this...

Go to Effects>Distort>Bulge... and play with the settings to make the tail more interesting...

Make the tail part of the body. Select part of the heart shape with the Ellipse Select tool. Then Delete.


Merge the 2 layers together.


Top fin
Insert a new layer, call it "top fin".

Set the Shape tool to Triangle (or do another heart) ...

...and draw/rotate a triangle at the top like this...

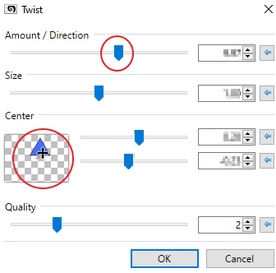
Apply the Twist effect (under Effects>Distort)

Make sure you play with the center area and then the amount.


If you need to move/rotate it, use the Move Selected Pixels tool

[Enter] or CTRL+D when you're done to get rid of the dotted outline.

Go to Adjustments>Hue/Saturation

Play with the Hue or Saturation sliders to make the fin stand out more (darker or lighter).


side fin
Insert a new layer for the side fin - rename it and make sure it's above the body layer.

Change the Shape tool to a Trapezoid.

Draw a trapezoid and rotate it like this...

Go to Effects>Distort>Twist and twist it a little to make it more interesting.

Go to Adjustments>Hue/Saturation again - this time you don't have to play with the sliders if you want it to be the same color as the top fin.

If you like it better, you can move the top fin behind the body, but the side fin HAS to stay in front.


Eyes
Set your colors to default.

Insert a new layer, and rename it "eye".

Select the Ellipse shape tool

Draw the eyeball shape. Then click off the shape to set it.

Change the Ellipse Shape tool to draw Fill Only and draw the pupil. Click off the shape when you're happy with the size/position of it.


Switch colors (so white = primary), then draw a highlight white circle near the top of the pupil. Click off to set the shape.


Duplicate the eye layer.


Use the Move tool and move the 2nd eye over to the right, so it's overlapping. [Enter] or CTRL+D to deselect when you're done.


Mouth
Insert a new layer above the eye layers, call it "mouth"

Option #1: Curve + Teeth
Select the Line/Curve tool. Switch your colors back to default.


Draw a line for the mouth. Then push/pull the circles to get a smile.

Insert a new layer, call it "teeth'.

Select the Shape tool. Set it to a Triangle and reduce the thickness to 3.

Now draw a triangle for a tooth and move/rotate it onto the mouth line.

Repeat for a few more teeth

option #2: shapes
One option is to use the Lightning bolt shape and draw it going over the edge a bit. Another option is to use the Heart shape. You can also set the fill to another color than white.


To make the mouth shape more interesting, add an Effect (under Distort).
- Lightning Bolt --> Twist
- Heart --> Bulge


For the Lightning Bolt, we need to delete the shape outside the body.
- Select the Wand tool
- Select the body layer
- Click on the inside area of the body


- Select the mouth layer now.
- Invert the selection (CTRL+I) and
- Delete


If you use the Heart Shape, select a bit with the Ellipse Select tool and adjust the selection (resize/rotate) if needed. Then Delete


stripes
To make your fish more colorful, we can add spots or stripes... Choose any color for filling that you think will stand out...

- Insert a new layer, renaming the layer "stripes"
- With the Line/Curve tool - set to 20 - 30 (depending on the size of your fish, you want to be able to fit about 6-8 stripes over the body)


- Duplicate this layer and move it over a bit.
- Repeat until you've got 6-8 stripes.
- When you've done, deselect (CTRL+D).


For the copied stripe layers, go to Adjustments>Hue/Saturation and change the colors so you have 4 or 8 different colors.

Merge all the stripe layers together... just the stripes together, not with the mouth/eyes/etc.


effects
Try different effects until you find one you like. Here are some good options:
- Effects>Distort>Crystalize
- Effects> Distort> Dents
- Effects> Photo>Glow
- Effects> Blurs>Fragment


delete stripes outside body
- Make the 'body fill' layer active.
- Select the Magic Wand tool
- Select the body (click on the filled area)


Invert the selection (CTRL+I or Edit>Invert selection).

- Make your "stripes" layer active again.
- Delete


Move the stripes layer behind the fins, just above the body.


Background gradient
- Make the Background layer active.
- Set your colors to whatever you think will look good with your fish colors.
- Use the Gradient Tool with a gradient - click and drag


[Enter] or click on another layer/tool to set the gradient and you're done.

Examples
Here are other examples, some using different shapes for the mouth and/or more effects...


